Customizing checkout fileds using actions and filters
How are checkout fileds loaded to Woocommerce ?
The billing and shipping fields for checkout pull from the country class class-wc-countries.php and get_address_fields function. This allows Woocommerce to enable/disnable fields based on the user's location.
Before returning these fields. Woocommerce puts the fields through a filter. This allows them to be edited by third party plugins, themes and your own custom code.
That means you have full control over checkout fields - you only need to know how to access them.
Overriding core fields:
Hooking into the woocommerce_checkout_fields filter lets you override any field. As an example, lets change the placehold on the order_comments fields Currently, it’s set to:
_x('Notes about your order, e.g. special notes for delivery.', 'placeholder', 'woocommerce')
We can change this by adding a function to our theme functions.php file:
// Hook in
add_filter( 'woocommerce_checkout_fields' , 'custom_override_checkout_fields' );

// Our hooked in function - $fields is passed via the filter!
function custom_override_checkout_fields( $fields ) {
     $fields['order']['order_comments']['placeholder'] = 'My new placeholder';
     return $fields;
}
You can override other parts, such as labels:
// Hook in
add_filter( 'woocommerce_checkout_fields' , 'custom_override_checkout_fields' );

// Our hooked in function - $fields is passed via the filter!
function custom_override_checkout_fields( $fields ) {
     $fields['order']['order_comments']['placeholder'] = 'My new placeholder';
     $fields['order']['order_comments']['label'] = 'My new label';
     return $fields;
}
Or remove fields:
// Hook in
add_filter( 'woocommerce_checkout_fields' , 'custom_override_checkout_fields' );

// Our hooked in function - $fields is passed via the filter!
function custom_override_checkout_fields( $fields ) {
     unset($fields['order']['order_comments']);

     return $fields;
}
Here’s a full list of fields in the array passed to woocommerce_checkout_fields:
Billing
billing_first_name
billing_last_name
billing_company
billing_address_1
billing_address_2
billing_city
billing_postcode
billing_country
billing_state
billing_email
billing_phone
Shipping
shipping_first_name
shipping_last_name
shipping_company
shipping_address_1
shipping_address_2
shipping_city
shipping_postcode
shipping_country
shipping_state
Account
account_username
account_password
account_password-2
Order
order_comments
Each field contains an array of properties:
type – type of field (text, textarea, password, select)
label – label for the input field
placeholder – placeholder for the input
class – class for the input
required – true or false, whether or not the field is require
clear – true or false, applies a clear fix to the field/label
label_class – class for the label element
options – for select boxes, array of options (key => value pairs)
In specific cases you need to use the woocommerce_default_address_fields filter. This filter is applied to all billing and shipping default fields:
country
first_name
last_name
company
address_1
address_2
city
state
postcode
For example, to make the address_1 field optional:
// Hook in
add_filter( 'woocommerce_default_address_fields' , 'custom_override_default_address_fields' );

// Our hooked in function - $address_fields is passed via the filter!
function custom_override_default_address_fields( $address_fields ) {
     $address_fields['address_1']['required'] = false;

     return $address_fields;
}
Defining select options
If you are adding a field with type ‘select’, as stated above you would define key/value pairs. For example:
Priority in regards to PHP code helps establish when a bit of code — called a function — runs in relation to a page load. It is set inside of each function and is useful when overriding existing code for custom display.
Code with a higher number set as the priority will run after code with a lower number, meaning code with a priority of 20 will run after code with 10 priority.
The priority argument is set during the add_action function, after you establish which hook you’re connecting to and what the name of your custom function will be.
In the example below, blue text is the name of the hook we’re modifying, green text is the name of our custom function, and red is the priority we set.
Examples
In this example, the code is set to redirect the “Return to Shop” button found in the cart to a category that lists products for sale at http://example.url/category/specials/.
/**
* Changes the redirect URL for the Return To Shop button in the cart.
There, we can see the priority is set to 10. This is the typical default for WooCommerce functions and scripts, so that may not be sufficient to override that button’s functionality.
Instead, we can change the priority to any number greater than 10. While 11 would work, best practice dictates we use increments of ten, so 20, 30, and so on.
/**
* Changes the redirect URL for the Return To Shop button in the cart.
With priority, we can have two functions that are acting on the same hook. Normally this would cause a variety of problems, but since we’ve established one has a higher priority than the other, our site will only load the appropriate function, and we will be taken to the Specials page as intended with the code below.
/**
* Changes the redirect URL for the Return To Shop button in the cart.
* BECAUSE THIS FUNCTION HAS THE PRIORITY OF 20, IT WILL RUN AFTER THE FUNCTION BELOW (HIGHER NUMBERS RUN LATER)
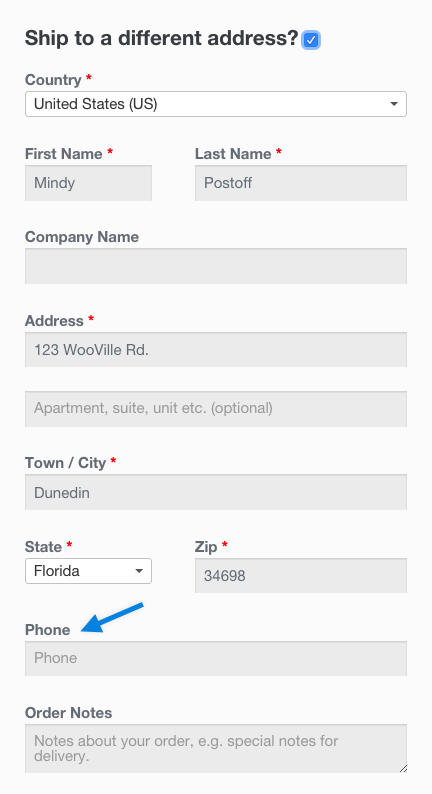
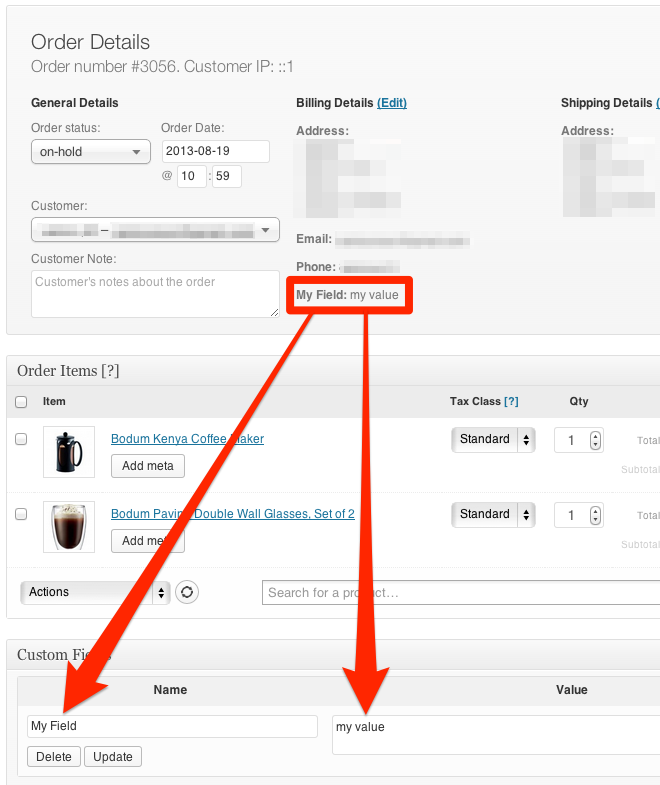
What do we do with the new field? Nothing. Because we defined the field in the checkout_fields array, the field is automatically processed and saved to the order post meta (in this case, _shipping_phone). If you want to add validation rules, see the checkout class where there are additional hooks you can use.
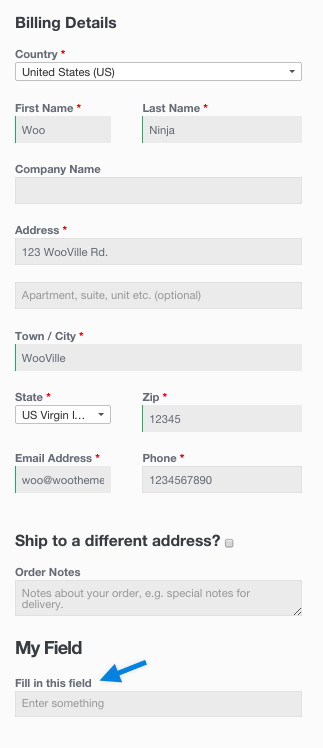
Adding a Custom Special Field
To add a custom field is similar. Let’s add a new field to checkout, after the order notes, by hooking into the following:
Laravel is a PHP framework developed with developer productivity in mind. Written and maintained by Taylor Otwell, the framework is very opinionated and strives to save developer time by favoring convention over configuration. The framework also aims to evolve with the web and has already incorporated several new features and ideas in the web development world—such as job queues, API authentication out of the box, real-time communication, and much more. In this article, we’ll explore the ways you can build—and test—a robust API using Laravel. We’ll be using Laravel 5.4, and all of the code is available for reference on GitHub.
Docker provides lightweight containers to run services in isolation from our infrastructure so we can deliver software quickly. In this tutorial, I will show you how to dockerize Nodejs Express and MongoDB example using Docker Compose .


 wc-custom-checkout-field-display-in-emails.php.php hosted with
  by GitHub
Comments
Post a Comment